A new feature in DocAssist as of build 1094 is “Clippings”. We like to think of clippings as an easier and more versatile version of autotexts or building blocks. As you probably know, autotexts and building blocks can only be saved to templates, there’s not many options for organising them, sharing is a pain, and updating them is even more painful.
So what are Clippings. Well they are really just documents that can be inserted in to another document. Not hugely exciting until you see how they can be used.
First of all you need to configure the locations for the clippings. You can have up to 3 locations currently. We recommend Personal, just for you, Shared for your department or practise group, and Precedents for firm or company wide clippings. The locations can be on a network or local – whatever works best for you.
If you have DocAssist build 1094 or newer, you will see the configuration settings within the Settings.xml file.
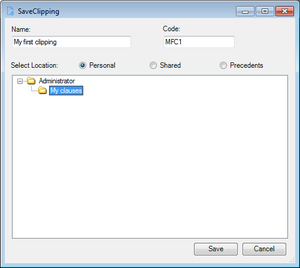
Now create some clippings. In a Word document, highlight some text you want to reuse as a clipping. Then press Shift Alt S (the shortcut we usually setup – or run the SaveClipping macro) and you will get the following screen.
 Save Clipping screen
Select a location to save to, and then select a folder. You can also right click to create your own folders, or rename existing ones.
Give your clipping a name, and also an optional code, and hit save.
What’s the code for…that’s the fun part. Create a new document in Word, and then type in the code and press F3 (or run the InsertClipping macro) DocAssist will find the clipping and insert it in your documents – just like an autotext/building block.
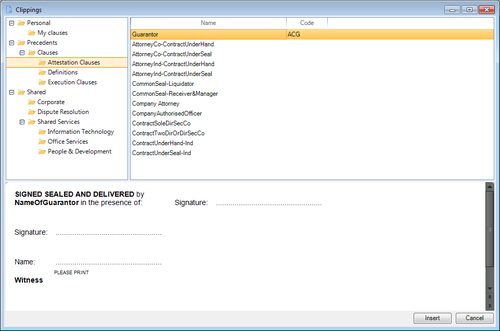
And for those clippings you don’t have a code for, or you forget the code, you can browse all of the clippings that are available just by clicking on the Clippings button on the ribbon.
 Browsing for clippings
So now you have a simple way to save your own autotexts, or share them with your department or entire company or firm. You can create a standard set of codes to have them easily and quickly inserted in to documents. Plus you can create your own taxonomy for sorting your clippings.
And to top it off, you can even create shortcuts to specific folders within your clippings. So you can have options on the ribbon to say insert an execution clause, or insert an address, and it will bring up a list of all clippings from that location.
This is a very simple yet powerful feature and has received great feedback so far, so make sure you give it a go. It’s all now part of DocAssist.