In Word 2003, if you need to know if a document contains any VBA code/macros in it, you can use the following function.

Function ContainsCode(ByVal Doc As Document) As Boolean
ContainsCode = False
Dim comp As Object
For Each comp In Doc.VBProject.VBComponents
  If comp.CodeModule.CountOfLines > 0 Then
    ContainsCode = True
    Exit Function
  End If
  Next
End Function

To get the function to work correctly, you will need to change a security setting and enable the “Trust access to the VBA project object model” setting.

Once you’ve enabled that setting you can do lots of fun stuff within VBA – but I’ll cover that in some other posts one day.

Then just call the function with the document you want to check, such as:

If ContainsCode(ActiveDocument) then MsgBox “This document contains macros”

Life is much easier in Word 2007 and 2010. You can just use the HasVBProject property of the document. It returns TRUE if there is code in the document, otherwise it’s FALSE.

If ActiveDocument.HasVBProject then MsgBox “This document contains macros”

Too easy! Microsoft was even nice enough to add it to not only the Document object model, but also to the Workbook and Presentation objects, so it is also available in Excel and PowerPoint. Nice one – it’s about time there were some more consistencies between the object models in Office.

I like it when my code becomes redundant for a good reason. Smile

I spend lots of time developing for different clients, and the problem is most clients have their own drive mappings pointing to specific network locations. In a lot of cases, I need to replicate these drive mappings as it’s usually where they store their Workgroup templates for Word, Excel and PowerPoint.

So instead of setting up all these drive mappings that point to network locations, I use the old SUBST command from a command prompt  to create a “fake” drive mapping that points to a local directory.

Generally I setup a single “Clients” directory on my C: drive, and then create a subdirectory for each client in there.

Then, I use the subst command to map the drive:

subst t: “C:\Clients\Client 1”

Now you have a new T: drive mapping that you can use like any other drive mapping.

Once you’re finished with the mapping, you can remove it with the following command:

subst t: /d

If you want more info on using SUBST, just check out the Wikipedia article which contains some good additional information.

So who says men can’t fake it? They can now! Winking smile

Now all we need is a utility to change all of the Word File Locations and to set these drive mappings, then we could easily switch between different Word environments for clients or testing.

Well as it turns out, I’ve already written one (Ah, nothing like a bit of self promotion) If you’re interested in trying it out, let me know – it’s very handy if you’re a Word coder, developer or tester, and best of all it’s free. I’ll get around to putting it on the site one day!

In the meantime, here’s a screenshot of the latest build of WordConfig…


Do you have lots of custom toolbars in Word 2003 and can’t work out where they are coming from? I’ve had this problem so many times, especially when preparing lots of templates to move to 2010.

Well, turns out it’s really simple – just run the following command in the immediate window in the VBA Editor (obviously change toolbarname with the name of the toolbar your after):

? Commandbars(“Toolbarname”).Context

and then you’ll get the full path to file that contains the toolbar. And yes, include the ‘?’ at the start – it means “print” so it will return the value onscreen.

One of my fave features in Word 2010 is the new custom undo records. It allows you to group your changes via code into blocks that can be undone in a single go – plus you can name the records.

Take the following sub:

Sub InsertSomeText()
Selection.TypeText “This is a test”
Selection.TypeParagraph
Selection.TypeText “This is some more text”
End Sub

If you ran this sub, and then went to the undo option, you’d see the 3 entries for each line of code that changed the document.


Now, here’s the same sub using a custom undo record.

Sub InsertSomeText()
Dim myUndoRecord As UndoRecord
Set myUndoRecord = Application.UndoRecord
myUndoRecord.StartCustomRecord (“My text insert to undo”)
Selection.TypeText “This is a test”
Selection.TypeParagraph
Selection.TypeText “This is some more text”
myUndoRecord.EndCustomRecord
End Sub

And after running that code, here’s what the undo options look like.


Nice!

You can also do nested undo records if you like, not that I’ve had a real need for them yet. But I may do very soon as I’m just about to do some work where I need to audit changes and have multiple levels of rolling back. Fingers crossed I’ll be able to do it all with nested undo records.

Maybe I should dig out my old Weezer CDs and listen to “Undone – The Sweater Song” when I’m working on that code! Ah, what a great song. I won’t get much coding done with Weezer belting out…

Have you ever tried to get the edit time from the IManDocument or NRTDocument objects within Autonomy WorkSite?

There’s the AccessTime property which returns the date plus time, but the EditDate property is just the date, and the time part is missing (set to 12:00am). So how do you get the date and time?

Turns out you need to use the GetAttributeValueByID method instead, which exposes both the EditDate and EditTime values, so you can just add them together to get the full DateTime value.

wsDocument.GetAttributeValueByID(imProfileAttributeID.imProfileEditTime) + wsDocument.GetAttributeValueByID(imProfileAttributeID.imProfileEditDate)

It’s easy when you know how. Just annoying that they can’t make it easier by exposing a single property directly on the object. Maybe in WorkSite 9.0 perhaps? ;-)

Usually the cause of documents being slow to open in Word is when the attached template is missing – especially when the template is located on a network. Turns out with Word 2010 there can be another reason.

We had a client where some documents were taking between 25 and 30 seconds to open, but only for some users. Word displayed Validating. Press Esc to Cancel in the status bar, but pressing Escape didn’t help.

A bit of research about what the validation process does led me to this article http://blogs.technet.com/b/office2010/archive/2009/12/16/office-2010-file-validation.aspx.

I then found that disabling the validation process by setting the following registry value made the documents open instantly.

[HKEY_CURRENT_USER\Software\Microsoft\Office\14.0\Word\Security\FileValidation]
“EnableOnLoad”=dword:00000000

Interestingly the offending documents appear in the list contained in the HKEY_CURRENT_USER\Software\Microsoft\Office\14.0\Word\Security\FileValidation\FailedFiles key, so there is something up with them, but we won’t go into that.

Now the other point the article made was that the process only runs on untrusted documents. This turned out to be the key. I re-enabled validation, and added the path to where the attached template was located as a trusted location, and voila, the document opened quickly.

In the end the problem turned out to be a group of users who weren’t getting their Workgroup Template path set correctly, so therefore the network templates were not being trusted.

I’m spending a lot of time in issues lists at the moment, and so many issues are very poorly logged, with no details or steps on how to replicate the problem. Well that’s where the Problem Steps Recorder in Windows 7 comes in very handy.

Get the users to type in PSR into the search box in the Start Menu and hit enter – this will run the Problem Steps Recorder.

Now all they need to do is hit the record button, go through the steps to replicate the problem, hit stop, save the zip file and then email it to you. Simple. And you get a detailed log of what they did, including screenshots so you can see exactly what happened. Much easier to debug your issues now!

Occasionally we come across issues when moving databases from one SQL server to another.  One of the most tricky situations is when you cannot get access to the applications configuration settings for the database you are required to move.

This can be for various reasons, like forgotten passwords, poor application design or where the configuration settings are hard coded into the application itself.

For situations like these you need to think outside the box, especially if there are time constraints involved.

There is a little known tool that comes with Windows called the SQL Server Client Network Utility.  One of the handy things this tool allows you to do is register SQL server instances as aliases.

Therefore you can force all SQL traffic for a particular SQL server instance to another SQL server instance for the server hosting the application.

Please note, I think this tool should only be used only as a last resort when you cannot configure the application through the normal method.

To configure a SQL server instance as an alias, please follow the steps below:

    1. Log onto the server hosting the application as an administrator
    2. Stop any relevant services
    3. Start > Run > cliconfg
    4. Click on the Alias Tab > Click Add

    1. Under Server alias enter the old SQL server instance
    2. Under Server name enter the new SQL server instance
    3. Uncheck Dynamically determine port and enter port 1433 (or an appropriate SQL port if changed from standard)
    4. Click OK

The alias screen should then look similar to the following.  

  1. Click Apply>Click OK
  2. Start any appropriate services
  3. Test the application that it is using the new SQL server via the activity monitor

I experienced an interesting (or should that be frustrating) problem recently during an Office 2010 migration.

We have some code in Word that saves the current document into Autonomy WorkSite. The code works by doing a Save As of the current document to a temporary file, and then saving the document again to free up the first file, which is then imported or checked-in into WorkSite, all pretty standard stuff.

The code has been working fine in 2010 until we changed the default document format for Word from DOCX to DOC. As soon as we changed the document format, Word continues to hold both documents open, and therefore the import/check-in process for WorkSite fails with a “The process cannot access the file because it is being used by another process” error (the error number is -2147221472)

You can easily replicate the issue with the following VBA code which saves the current active document to two different temp files, and then tries to delete the first file:

Sub SaveAsDemo()
ActiveDocument.SaveAs2(Environ(“TEMP”) & “\TestDoc1.doc”)
ActiveDocument.SaveAs2(Environ(“TEMP”) & “\TestDoc2.doc”)
Kill(Environ(“TEMP”) & “\TestDoc1.doc”)
End Sub

If you have the “Save files in this format” setting set to Word Document (*.docx), the code will run fine. Now change the setting to Word 97 – 2003 Document (*.doc) and run the code, and you’ll get a Run-time Error (70), Permission denied. If you look in the temp directory, you’ll see both files are still open (they have corresponding Word temp files)

So how do you get around this “undocumented feature”?

I found a couple of blog posts that mentioned that it’s just a matter of timing, and a pause would fix this issue. In my testing, this didn’t work (since it didn’t work when I just step through the code)

What I did find that worked was just doing it all twice! So the following code works a treat:

Sub SaveAsDemo()
ActiveDocument.SaveAs2(Environ(“TEMP”) & “\TestDoc1.doc”)
ActiveDocument.SaveAs2(Environ(“TEMP”) & “\TestDoc2.doc”)
ActiveDocument.SaveAs2(Environ(“TEMP”) & “\TestDoc1.doc”)
ActiveDocument.SaveAs2(Environ(“TEMP”) & “\TestDoc2.doc”)
Kill(Environ(“TEMP”) & “\TestDoc1.doc”)
End Sub

No idea why this works – it just does!

So in the production code I added a check to see what the default save format was, and did an extra lot of saves if it was set to Doc.

Sub SaveAsDemo()
ActiveDocument.SaveAs2(Environ(“TEMP”) & “\TestDoc1.doc”)
ActiveDocument.SaveAs2(Environ(“TEMP”) & “\TestDoc2.doc”)
If Application.DefaultSaveFormat = “Doc” Then
            ActiveDocument.SaveAs2(Environ(“TEMP”) & “\TestDoc1.doc”)
ActiveDocument.SaveAs2(Environ(“TEMP”) & “\TestDoc2.doc”)
End If
        Kill(Environ(“TEMP”) & “\TestDoc1.doc”)
End Sub

And there you have it, a dodgy workaround around for a very dodgy problem. Hopefully it’ll get fixed one day soon (but where would the fun in that be!)

Autonomy recently released WorkSite 8.5 SP3 Update 1, which includes updated integration for Office 2007 and 2010. The integration, so far, is much better than the old version.

The only problem is that it kills all your code that used the old iManOXP.dll (iManO2K.iManageExtensibility) but don’t worry, it’s easy to update your code to get it running.

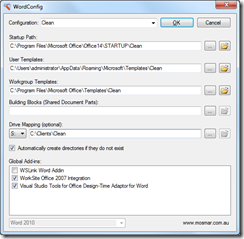
I’ll walk through updating a Word template (VBA), but the same general principles apply to VB6 or VB.Net.

  • Firstly, open your custom Word template, go to the VBA editor and remove the reference to “WorkSite Office2000 Integration”. Add a new reference to “WorkSite Integration Interfaces Library”.
  • Now change all your objects that use the old iManO2K.iManageExtensibilty object and point instead to WorkSiteAddinInterfaces.iManageExtensibility (you could just do a search through the entire project for iManO2K.iMan and replace with WorkSiteAddinInterfaces.iMan to save hunting around)

For example:

Private WithEvents objWorkSite As iManO2K.iManageExtensibility

becomes

Private WithEvents objWorkSite As WorkSiteAddinInterfaces.iManageExtensibility

  • Then change the name used for the WorkSite COMAddin from either “iManO2K.AddinForWord2000” if you’re coming from Word 2003, or “oUTR02K.Connect” for Word 2007/2010 to “WorkSiteOffice2007Addins.Connect”.

For example:

Set objWorkSite = Application.COMAddIns(“iManO2K.AddinForWord2000”).Object

or

Set objWorkSite = Application.COMAddIns(“oUTR02K.Connect”).Object

becomes

Set objWorkSite = Application.COMAddIns(“WorkSiteOffice2007Addins.Connect”).Object

  • Next you need to update the parameters of any of the events that use the type Object, and change them to use the type Variant instead.

For example:

Private Sub objWorkSite_DocumentBeforePrint(ByVal Doc As Object, IgnoreIManagePrint As Boolean, Cancel As Boolean)

becomes

Private Sub objWorkSite_DocumentBeforePrint(ByVal Doc As Variant, IgnoreIManagePrint As Boolean, Cancel As Boolean)

You shouldn’t need to change the code within any of those subs.

And that should be it – with any luck your addins and templates will start working again. I guess I better get cracking updating all our other apps, addins and code. Keep you posted on what else I discover.


Update on Monday, July 4, 2011 at 10:16PM

Turns out that the members of the ConnectionMode enumerated type have changed slightly – they’ve been prefixed with ConnectionMode_.

So if you’re checking the connection mode of WorkSite, then you’d change the code from

If objWorkSite.CurrentMode = nrindeterminatemode Then objWorkSite.Connect

to

If objWorkSite.CurrentMode = ConnectionMode_nrindeterminatemode Then objWorkSite.Connect


Update on Wednesday, June 27, 2012 at 4:18PM

As of WorkSite 8.5 SP3 Update 5, the Office Integration is backwards compatible, so there’s no need to do any of this updating, your code should now just work. So forget about the other versions and go straight to Update 5 and newer.

© Copyright - DocAssist 2022