We are blessed with amazing clients that are happy to share the experience of their journey working with us.
We have a new Case Studies page on our site which will be regularly updated with stories about our engagements with our clients.
We are blessed with amazing clients that are happy to share the experience of their journey working with us.
We have a new Case Studies page on our site which will be regularly updated with stories about our engagements with our clients.
iManage Work 10 is a modern implementation of the classic iManage solution.
The features were designed by legal professionals for legal professionals. Work 10 introduces a platform that is native to the cloud, native to mobile devices, and includes a redesigned desktop client to offer a complete New Professional Experience between the web and the desktop.
iManage Work Server 10 is also backward-compatible, making new features available to your iManage Work classic clients without any interruption to the desktop. Security has been enhanced and modernised with single sign-on, touch ID, and downloadable Briefcase for secure offline productivity and synchronisation.
This article outlines what to expect from your iManage Work10 upgrade as an installer. Part II of this article will discuss what you can expect as a developer.
The latest version of iManage Work Server available is 10.1.3 (10.1.3.67) and iManage Work Desktop for Windows is 10.1.3 (10.1.3.21)
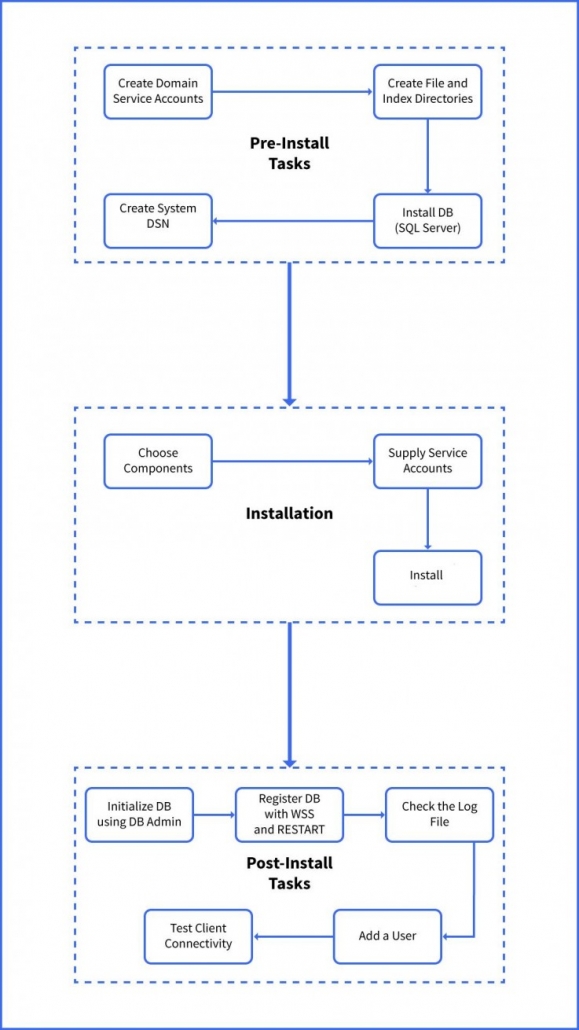
The following are the high-level instructions for installing iManage Work Server:
The installation process consists of three important phases:
The following workflow depicts the order of these phases with the tasks that must be completed in each phase
To install iManage Work Desktop for Windows client
The exe ‘s and the detailed description for installation of work 10 server and client can be downloaded from iManage support site.
Please get in touch with us should you need any help with your Work 10 upgrade.
We have years of experience with this product and know the intricate details of how to go about your upgrade.
A new feature in DocAssist as of build 1094 is “Clippings”. We like to think of clippings as an easier and more versatile version of autotexts or building blocks. As you probably know, autotexts and building blocks can only be saved to templates, there’s not many options for organising them, sharing is a pain, and updating them is even more painful.
So what are Clippings. Well they are really just documents that can be inserted in to another document. Not hugely exciting until you see how they can be used.
First of all you need to configure the locations for the clippings. You can have up to 3 locations currently. We recommend Personal, just for you, Shared for your department or practise group, and Precedents for firm or company wide clippings. The locations can be on a network or local – whatever works best for you.
If you have DocAssist build 1094 or newer, you will see the configuration settings within the Settings.xml file.
Now create some clippings. In a Word document, highlight some text you want to reuse as a clipping. Then press Shift Alt S (the shortcut we usually setup – or run the SaveClipping macro) and you will get the following screen.
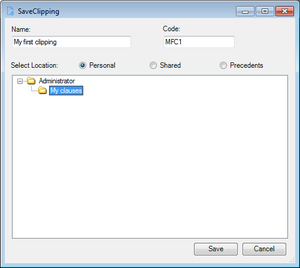 Save Clipping screen
Select a location to save to, and then select a folder. You can also right click to create your own folders, or rename existing ones.
Give your clipping a name, and also an optional code, and hit save.
What’s the code for…that’s the fun part. Create a new document in Word, and then type in the code and press F3 (or run the InsertClipping macro) DocAssist will find the clipping and insert it in your documents – just like an autotext/building block.
And for those clippings you don’t have a code for, or you forget the code, you can browse all of the clippings that are available just by clicking on the Clippings button on the ribbon.
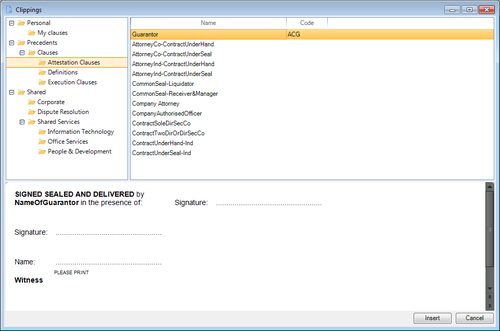 Browsing for clippings
So now you have a simple way to save your own autotexts, or share them with your department or entire company or firm. You can create a standard set of codes to have them easily and quickly inserted in to documents. Plus you can create your own taxonomy for sorting your clippings.
And to top it off, you can even create shortcuts to specific folders within your clippings. So you can have options on the ribbon to say insert an execution clause, or insert an address, and it will bring up a list of all clippings from that location.
This is a very simple yet powerful feature and has received great feedback so far, so make sure you give it a go. It’s all now part of DocAssist.
Have you ever tried to open a .CHM file in Windows, and it shows the index but no content? Not exactly HELPful. It had me stumped when checking out the NetDocuments ndOffice extensibility documentation.
Well it turns out to be such a simple fix. Right click on the .CHM file, select Properties, then select Unblock.
Too easy.
I’ve been having an extremely strange issue with a custom application. Basically the application is a form that displays to the user so they can select some options relating to how they want to print a document in Word. The form then goes off and does a few things with the printer driver and prints the document as required.
For some strange reason the form started playing up recently, and users were reporting that it was locking up sometimes, and the only way you could close it was to end the WinWord process in Task Manager which is a little drastic!
With a bit of debugging (and luckily being able to replicate the issue) I found the problem code was calling the DocumentPropertiesA function from winspool.drv. This was the part of the code that was updating the printer driver with the new settings. All of a sudden the call was not returning in some instances, but in a strange twist execution was returned to the form. No exception was returned. I enabled all the controls on the form to test further, and it turns out the form was indeed active again, and the buttons would work, but you could not close the form.
A bit of research reveals you cannot close a form if there is another event still running. So I guess the code running on the OK button event was considered to be still running.
If I clicked on the OK button again, the same code would run, but at the same line of troublesome code would actually return an AccessViolationException error, and you could not continue the code.
So a bit more research and yes, AccessViolationException is bad, and your code should stop.
But here’s where it gets interesting. In versions of .Net 3.5 and earlier, an AccessViolationException would get passed back to the CLR and you could trap it. As of version 4 it does not. Well thanks for that Microsoft. You can read all about it here. That was like trying to find a needle in a haystack.
Turns out the fix is pretty simple. In the class that was running, I added the following imports statement
Imports System.Runtime.ExceptionServices
Then on the actual sub that was running, I added the following attribute
<HandleProcessCorruptedStateExceptions()>
Public Sub Update()
And voila, the TRY CATCH around the problem line picks up the exception.
I can now catch the problem. Turns out it’s not fatal in this case, and the code can keep running, and even more strangely, it works. I suspect there is still another problem that needs a little more investigation, but I’m now back to a print dialog form that appears to work the same as before which no longer locks up. So happy users, and happy developer.
If you feel like reading more on exceptions, then here’s a little more light reading that you may find interesting, I know I did. http://msdn.microsoft.com/en-us/magazine/dd419661.aspx#id0070035
It all became a reality when I right-clicked on my solution to add a new project. I thought I had made a mistake. How couldn’t I add a simple setup project after writing all that code? After a minute or two of intense (!) research, I received my answer:
“Visual Studio setup projects (vdproj) will not ship with future versions of VS.”
Like the rest of the world, my heart was broken. It took me countless hours to figure out how to use the broken setup project technology, what was I going to do now? [1]
I overheard Pratik and Chris talking about the WiX installer as an alternative to deploy a product. All I thought was, how hard could it be? Shouldn’t be a problem. Thanks to Pratik and an entire work day, I found that the learning curve for WiX is quite steep even though it is more powerful than what the setup projects offer. Only when you figure out how to use it. The same can definitely be said about InstallShield, you can ask Pratik.
Today when my job sheet said ‘compile when these changes are made’, it got me slightly worried because I haven’t worked with WiX or InstallShield before. I wasn’t ready for a day of studying how to deploy the project I have been working on for a week for one client. With the tiniest bit of hope, I googled how to setup project in Visual Studio. It was one of those Hail Mary moments with no hope until I saw this gem:
http://visualstudiogallery.msdn.microsoft.com/9abe329c-9bba-44a1-be59-0fbf6151054d
In April 2014, Microsoft caved and released a free official extension to Visual Studio 2013 that allows you to create installer projects. It is exactly the same as the installer project types in VS 2010[2] except for some minor bug fixes. All you have to do is download the extension from the abovementioned link or simply search “Microsoft Visual Studio Installer Projects” on the internet[3]. When your VS restarts (you have to close and reopen it) you will have setup wizard and project types just like you could before.
Voilà!
[1] The famous Visual Studio user request that has been up voted more than 6,000 times can be found at https://visualstudio.uservoice.com/forums/121579-visual-studio/suggestions/3041773-bring-back-the-basic-setup-and-deployment-project?page=40&per_page=20
[2] This is a good source to compare the 3 different installer deployment tool that Microsoft offers. http://msdn.microsoft.com/en-us/library/ee721500(v=vs.100).aspx
[3] Alternatively, you can use the Extensions and Updates dialog as well.
Sometimes you need to add a slight pause in your VBA code to make things work properly. Here’s a few ways to do just that.
Firstly, using the Timer function. This is what I use most of the time, it’s great if you need to wait a specific amount of time.
Sub Wait(ByVal Seconds As Single)
Dim CurrentTimer As Variant
CurrentTimer = Timer
Do While Timer < CurrentTimer + Seconds
Loop
End Sub
With this routine you can also pause for parts of a second by using
Wait 0.5
The most common method I find in code is just using a For loop with nothing in it. Change the value of the loop in order to vary the time of the pause.
Dim i as integer
For i = 1 to 1000
Next i
The problem is you don’t know exactly how long it will pause for, and it will vary from computer to computer. It’s not an exact science, but it often solves the problem, and hence why I see it around so much.
Another method is to use the Sleep function that is part of the Windows API
Declare Sub Sleep Lib “kernel32” Alias “Sleep” (ByVal dwMilliseconds As Long)
Sub Wait(ByVal Milliseconds as Long)
Sleep Milliseconds
End Sub
This method is good as it’s accurate down to the millisecond.
And lastly a method that is a little different to those above as it doesn’t pause your code but instead triggers code to run at a particular time. With this method the rest of your code after the call will continue to run, or if it’s at the end of your routine, then control will pass back to Word while waiting for your code to run.
Application.OnTime Now + TimeValue(“00:00:05”), “NameOfMacroToRun“
Just change the “NameOfMacroToRun” to (you guessed it) the name of the macro you want to trigger, and it will run in 5 seconds time. The cool trick you can do with this is use it to run code at a constant interval while Word is running just by getting the macro to call itself again. For example:
Sub CheckSettings
‘ Do whatever you need to do…
If Application.UserInitials <> “cp” then Application.UserInitials = “cp”
If Application.UserName <> “Mosmar” then Application.UserName = “Mosmar”
‘ Run again in 10 seconds time
Application.OnTime Now + TimeValue(“00:00:10”), “CheckSettings”
End Sub
Whilst this is probably a bad example, you get the idea. Whilst Word has plenty of events you can hook into, there’s lots that don’t exist (like selection change within content controls). By using the above you can replicate the functionality of events and create your own in VBA. Maybe I’ll save that for another blog post.
There are other ways to achieve a pause in your VBA code, but they are generally variations of the above so I won’t cover those. That’s what the rest of the internet is for.
Ever needed to know what registry entries are required to register a COM DLL? Well I did recently.
Sometimes you get caught out with Visual Studio Setup Projects (well that’s if you’re still using VS 2010 – bring back Setup Projects in VS Microsoft!) copying referenced DLLs locally and registering them by default. This often happens with WorkSite or Office addins.
I had an issue the other day where I updated a setup project and removed a reference for a particular DLL that I was having to change to use late binding instead (long story!)
Once I removed the reference and the DLL was no longer part of the install, when the upgrade ran the removal of the previous version unregistered this particular DLL, which then broke another application as the DLL in the original location is no longer registered (as it was overwritten by the local copy in your installer)
Well to get around the problem I needed to re-register the DLL as part of the install process for the new version. After much experimentation I decided it was easiest to simply add the registry entries for the DLL to the new installer.
This is where I came across a handy util that is part of Visual Studio – regcap. With Regcap you can find out what registry values are added when you register a DLL.
Just run regcap with the /o command and the name of the reg file you want to create, plus the name of the DLL you want to capture, as per the example below (the names of the actual DLL have been changed to protect the innocent – actually more likely to protect the guilty!)
C:\Program Files\Microsoft Visual Studio 10.0\Common7\Tools\Deployment>regcap /o c:\SomeAppDLL.reg “C:\Program Files\SomeApp\SomeAppExtension.dll”
Interestingly I had problems running this application on Windows 7 for this particular DLL. I tried several suggestions like setting compatibility mode for regcap, running as admin etc, but nothing worked for me. To get around the issue I copied the DLL to another dev machine running Windows Server 2003, and regcap worked a treat. I then imported the reg file that was created in the installer for my app, and problem solved.
Just found something very interesting in the release notes for WorkSite 8.3 SP3 Update 5 – all SDK components are now backwards-compatible with all previous 8.5 versions. Woohoo! No more updating code when going to SP3. That alone is worth the update!
Just a quick tip to save some time debugging classes. Did you know that if you make changes to a class, the changes don’t take effect until you re-instantiate the class? That’s why you don’t see your changes taking effect, or your breakpoints being hit.
So, just re-run the AutoExec routine in the template you are editing (because that is usually where your class is initialised) and you should be in business.
If not, then possibly your class is not initialised in a separate routine, but is declared as a new instance of the class, like so:
Dim oMyClass As New MyClass
where MyClass is the name of your class. Just do a search through your code for the New keyword followed by the name of your class if you don’t know where it is.
If this is the case, then change the declaration to:
Dim oMyClass As MyClass
Then in your AutoExec (or other routine that is called before the class is required), add the following:
Set oMyClass = New MyClass
Now you can make changes to your class, rerun AutoExec (or the other macro that instantiates the class) and you can continue to debug. Saves restarting Word and having to setup all your breakpoints again.
Get back to doing what you best, with a document automation solution that works the way you do.
Sydney, Australia
+61 2 7227 9390